Marketing
How to Installing WordPress on Localhost in Easy Mode?
Installing WordPress on C-panel and local host has been turned into a simple and easy task. Though some of the most famous hosting provider companies offer one-click installation for WordPress, it is just not enough. You always require a localhost web server solution to create a database and save your files when you are creating a local site.
There are numerous popular solutions out there to set up your WordPress on Localhost. Here are our top picks to make your job easy.
1. WAMP
2. MAMP
3. LAMP
4. XAMPP
This post contains guidelines for installing WordPress on localhost using XAMPP. The method mentioned here can be followed for all of the above. Follow the steps and get started with the installation of WordPress on localhost-
Download Xampp
The first method is quite simple. All you need to do is download Xampp from its official website. Choose your operating system and then click on the download button. There are many different versions available for a variety of operating systems. You should opt the one that is fit for your device.
Click on the download button and wait for a few seconds. Since it is a large file, it takes some time to be downloaded.
Install and Run on Your Device
The second step is to complete the installation process. So as soon as it is downloaded, just unzip the file and select the install button. Soon the installation process begins. After this you will see some checkboxes that are already marked. Now you need to unmark these boxes except for MySQL and phpMyAdmin. After a few seconds, you shall see a welcome notice notifying that the installation has been done perfectly. You might also see a security alert if you don’t have an antivirus installed. Click on the Allow Access button and carry on. Next comes the language select option. Just click on the language you want to choose and click on the save button.
The installation process ends with the question saying “Do You want to start the Control Panel now?” Check this box and click on the finish button. This automatically runs the XAMPP control panel on your device. With this the installation is complete.
Download the WordPress Latest Version
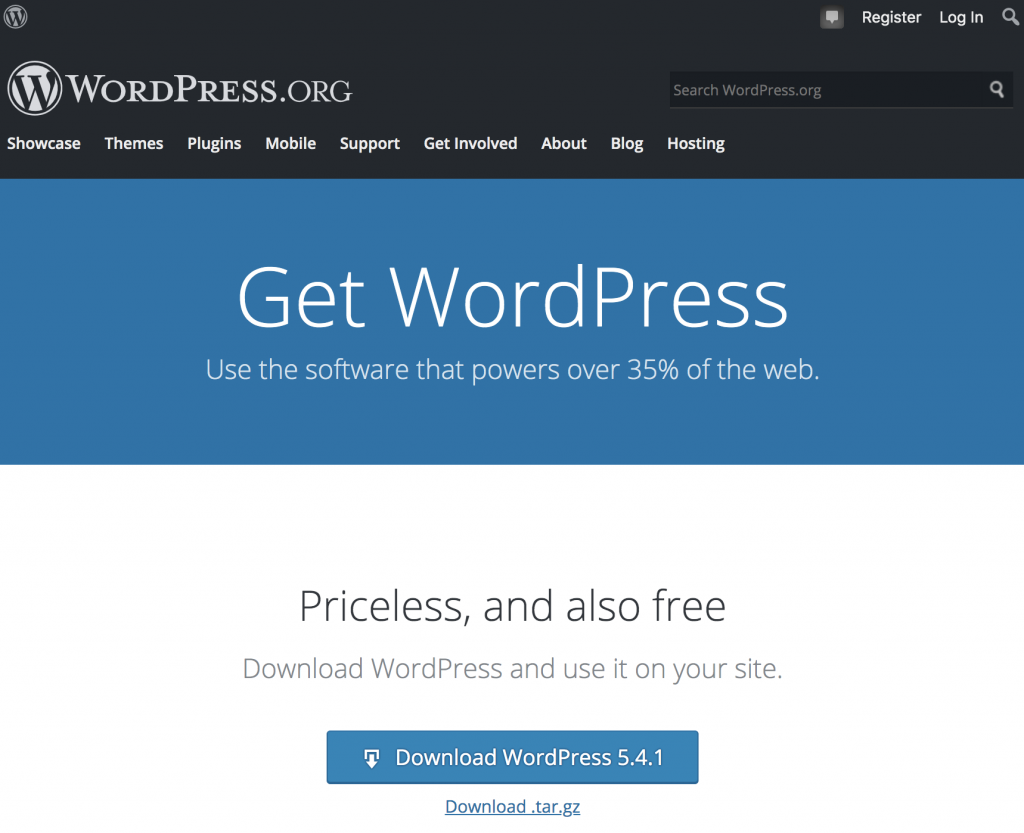
After the installation of XAMPP is the time to install WordPress on localhost. For this you need to download the latest version of WordPress. Go to the official WordPress website and download the WordPress latest version. Unzip the file and copy it for your next uses.
Create a Database
Prepare a folder in your PC so as to collect all your data in that folder. Go to the local disk where the XAMPP file is saved. Select the htdocs folder and paste the WordPress latest version that you have copied earlier. Rename the WordPress folder. In case you want to build your site with the name ‘WordPress’ itself, you can avoid this option. Always remember the name that you have used for the database folder. Now you have to open a new tab on your browser and go to localhost/phpmyadmin. Select the database, write the same name as of the folder and click on the create button. With this the process of creating a localhost database is complete. Now install WordPress on the localhost. Also now you have to select the Xampp control panel & click on MySQL and apache buttons.
Install WordPress on local host
For installation, you need to open a new tab on your browser and write localhost/your given name and click the ENTER button. This brings up a WordPress setup Wizard. Choose your language and Click on continue. The next part of this process requires A database name, user name, password, database host. Then click on the Let’s GO button. Now you need to enter your database name, put in the username and click on submit. You can now give a name to your site. Also fill in the username, strong password, e-mail address, and click on the Install WordPress button. Make sure you carefully uncheck the search engine visibility box or else Google shall start indexing your local site.
With this process, the WordPress installation on the localhost has been completed!

Shopify is definitely one of the most popular Ecommerce Website Builders today. It is easy to use and allows you to create a website that is tailored for your needs. Whether you are looking for a simple site that you can add products to, or you want a complex one that you can control from anywhere in the world, Shopify has what you are looking for.
Wix
Ecommerce solutions can be confusing, with all the choices available. When choosing, it’s important to understand the differences between them. This way, you’ll know whether the ecommerce solution you choose is the best choice for your online store.
Shopify is an ecommerce website builder, with a wide range of ecommerce features. It was designed for online retailers, and it also features advanced business management tools. In addition, it has a powerful analytics suite and an all-in-one inventory management system. It can be used to track products from suppliers to shipping.
It’s also easy to set up and configure. You can customize the appearance of your store with custom code, or you can use one of the hundreds of readymade themes.
You can sell on multiple social media channels, including Facebook, Twitter, Instagram, and Pinterest. And you can even sell on Amazon and Etsy.
Volusion
Volusion is a popular ecommerce website builder that offers an array of powerful tools. It’s also easy to use. It’s an excellent choice for small and medium-sized businesses.
Volusion is an all-in-one E-commerce solution, which means that it covers all aspects of an online store. This includes marketing, sales, and SEO. It also provides a centralized storefront with customizable design options.
There are three different pricing plans. The Personal plan is aimed at smaller businesses, while the Prime plan is best for larger companies. The cost of each plan is based on the annual sales volume of your business.
The first version of Volusion was a very user-friendly platform, but it was lacking in some features. The newer version, Volusion V2, has improved the speed and ease of use.
BigCommerce
BigCommerce is a popular ecommerce platform that allows you to build an online store without needing to write a single line of code. It offers a variety of features to help you grow your business.
Choosing a website builder is a crucial step for bringing your product to market. You need a tool that can help you create an online store and provide a simple and intuitive shopping experience.
With a website builder, you have access to a variety of templates and tutorials to help you get started. You can also take advantage of forums and customer support to get the help you need.
Many websites builders use a drag and drop feature to help you create your site quickly and easily. This allows you to create a website that looks professional and is easy to maintain.
Squarespace Commerce
For businesses that are serious about building an online store, there are several ecommerce website builders to choose from. Each has its own advantages and disadvantages. Choosing the right platform depends on a variety of factors, including the size of your business, your budget, and your vision for your future. However, there are some fundamental principles that will help you determine which one is best for you.
You’ll want to pick an ecommerce website builder that’s easy to use, offers a wide selection of templates, and has easy integration functionality. You can also choose a website builder that’s designed with content-based sites in mind.
The most popular ecommerce website builders are Shopify and Wix. Both offer powerful ecommerce features, high-quality web hosting, and excellent marketing tools.
Shopify vs GoDaddy
Shopify is a well-established website builder. It offers an easy way for anyone to set up their own online store. It also provides advanced tools for site creation, and includes great marketing and security features. Its features also include a built-in shopping cart.
GoDaddy, on the other hand, is a web hosting and domain name registrar. It is not as feature-rich as Shopify. Although it is inexpensive, it lacks some of the advanced features. It also doesn’t offer the same level of customization.
Shopify has a big app store and has some features that aren’t available on GoDaddy. This is due in part to the fact that Shopify is more geared towards ecommerce sites.
It also boasts a clutter-free interface, and has a variety of built-in tools. It has hundreds of themes, and offers a large library of professional templates. It’s also easy to establish a website on it without a lot of tech help.
A Shopify Overview
If you are thinking of starting a website that will sell products, then you should definitely consider using Shopify. This is a great platform that has become increasingly popular with web developers and business owners. It has a wide range of features that allow you to create your website in a quick and easy way. The system also allows you to integrate with other systems and apps. Among its many features is the product inventory management system, a scaleable pricing system, and Google Smart Shopping.
Product inventory management system
A product inventory management system on Shopify is a central database of inventory that helps your business avoid out-of-stock situations. It also allows you to monitor your inventory and make better business decisions. You can use it to manage your inventory across different locations and variants.
You can sort your inventory by Available, SKU, Z-A, and product title. You can also view the history of your inventory. Moreover, you can set up the number of products per variant to help you better understand your inventory.
If you want to add a new product or transfer existing items, you can do it easily. You can also add tags and edit quantities. A positive quantity means that the item is in stock. Similarly, a negative amount shows that the item is not in stock.
It is important to understand how to import and export your Shopify inventory. You can do this through an inventory CSV file. However, you should verify the data first. Otherwise, you might get inaccurate product amounts.
You can also export your inventory using the Pipe17 app. Its super-fast sync rates will give you an accurate view of your inventory across different locations. It can also be integrated with other Shopify features.
Katana is an additional third-party tool that is also very useful for Shopify inventory management. It offers advanced features that allow you to communicate with suppliers and make better purchases.
It can provide you with detailed reports on your sales, trends, and seasonality. It can also help you predict your product lead times. The inventory management software you choose should be easy to use and should integrate with other tools.
Scalable pricing system
There’s no secret that Shopify remains the gold standard when it comes to ecommerce. In the time it has been around, the company has grown from an ecommerce startup to a multimillion dollar behemoth with millions of users and brands on its books. The scalable pricing system is a prime example of this.
It is also the easiest of systems to implement, the scalable pricing system makes launching an ecommerce business a snap. For instance, you can launch an ecommerce site without having to worry about setting up an account, a problem for many small businesses. To get the ball rolling, sign up for a free 14-day trial and you’re on your way. In fact, the Shopify team is so sure you’ll be happy with the service that they offer a money-back guarantee. This is a major selling point for the service.
For example, the scalable pricing system allows you to add features and functionality as you go, rather than having to wait for someone else to make a decision for you. In the long run, your ecommerce business is likely to earn you more money in the process. You can also keep tabs on your most valuable customers to better engage them in the future. For example, Shopify has a feature called chat where you can schedule automated messages for your clients. You can also get a glimpse into your store’s most popular products by using their product catalog.
Performance overviews
If you’re a Shopify store owner, you can use performance overviews to better understand how your business is performing. This allows you to make smarter decisions about your store’s operations.
One of the best things about having a Shopify store is the amount of data you can collect. This means that you can take a comprehensive look at your sales, customer behavior, and more.
The best part is, you can do this without complicated setup or complex calculations. It’s all about leveraging the right data. Here are four ways to do that.
Shopify has several default reporting options. But if you’re looking for something more granular, you can easily customize reports to suit your needs. For example, you can make a report that displays the number of purchases by a certain visitor category. Or, you can create a report that tracks conversion rates by category. You can also build a report that shows how a particular product is generating sales.
You can also get a detailed breakdown of your site’s traffic, and how that traffic is divided into segments. This is useful for determining what type of content your customers are viewing, as well as identifying potential marketing strategies. You can also monitor your store’s mobile traffic, and identify which products are most popular in different countries.
Another thing to consider is the time it takes your website to load. This can be a problem for many Shopify sites, and will affect your customers’ experience. You should aim for a Time to First Byte (TTFB) of less than 0.3 seconds. If yours is longer than that, it could indicate a theme code issue.

The online pet store industry has been booming for the past few years and the competition is fierce. Australia alone has over 10 online pet stores. Pet retailers need to stay ahead and continuously increase sales if they want to see consistent and sustainable growth in their online business.
With the competition so tight, even the smallest website improvements can help increase your online conversions.
Can you teach an old dog new tricks? This week we’ll be looking at one of the most successful online pet retailers in Australia – Petstock – to learn how they stay best in show – and uncover the hidden op-purr-tunities to improve their conversions.
Traffic is high, and Load Speed could be improved
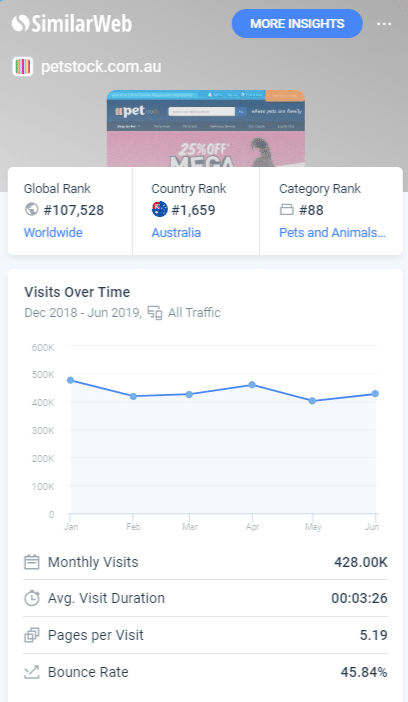
Currently, Petstock places third (behind PetBarn and PetCircle) for total traffic engagement per month in Australia for Pet and Animals websites, according to web traffic analytics site, Similar Web.
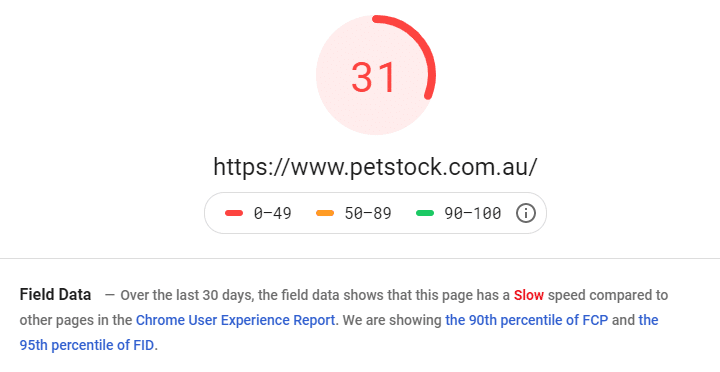
I tested the load time for each page as I moved along the buying journey, here are the results.
Home – 4.46s
Product – 5.6s
Cart – 5.9s
Checkout – over 20 secs for the 3 steps combined
According to industry-leading CRO experts, ConversionXL:
- 47% of people expect a web page to load in two seconds or less
- 57% of visitors will abandon a page that takes three seconds or more to load.
- At peak traffic times, more than 75% of online consumers left for a competitor’s site rather than suffer delays.
Buyers are impatient and are always comparing their shopping experience with other sites. Turtle speeds and long waiting times are a bad user experience. For Petstock, optimizing page load times may be something to explore.
Home Page
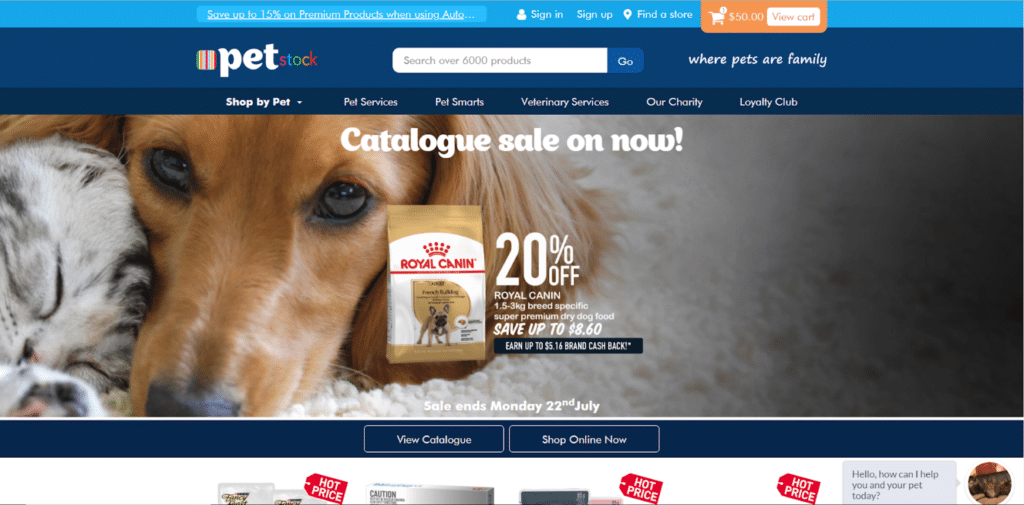
1. Use Headings and CTAs in banners that set & meet users’ expectations
Petstock’s home page changes based on current promotions and sales. We will be looking at just this edition in the screenshot.
Our attention is immediately drawn to the big CUTE puppy eyes and big orange view cart button before we even notice the promotion.
There is very low contrast between the title of the promotion “ Catalogue sale on now” and the background image. It doesn’t stand out and is easily missed. Good contrast between text and background colour or images and increasing the size of the text will make the promo heading easier to read for the shopper.
Given the prominence of the “Catalogue sale on now!” heading, I assumed the CTA button would lead to a sales page or the store’s catalogue. Instead, I was taken to a filtered category page with only Royal Canin dog food products.
The confusion could have been avoided if the heading had instead read “Royal Canin 20% off.” If the heading refers to the catalogue, it is natural to assume the CTA button would lead to an online catalogue.
Many customers may react in the same way. The largest heading trumps everything else in the same vicinity – make sure your headings and CTA buttons align and set and meet the right expectations.
We find the “View Catalogue” button further down the homepage but it’s not very obvious.
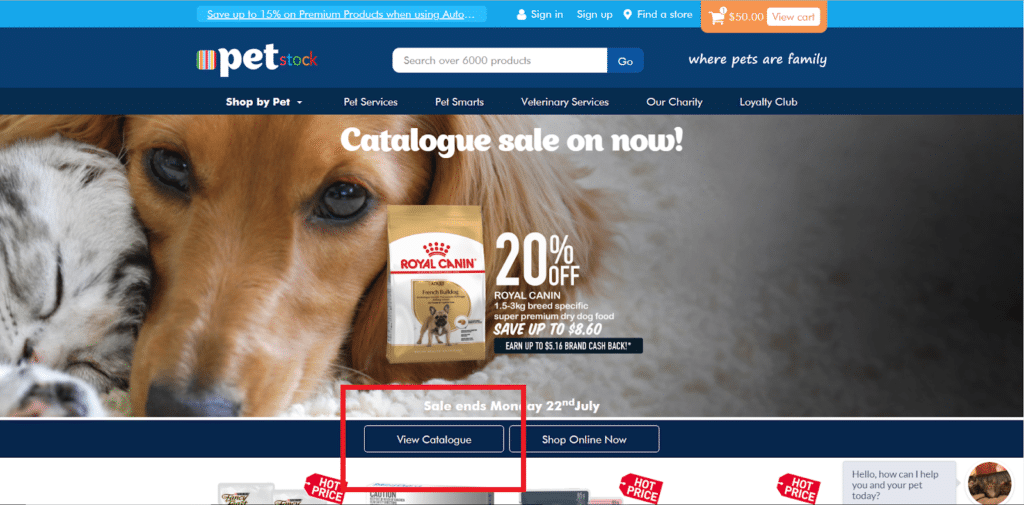
Recommended use of CTA buttons to drive catalogue conversions – If Petstock wants to push their catalogue sales, they could instead place their catalogue CTA as a large button in the centre of the page, coloured in orange just like their ‘view to cart’ button.
2. Always place compelling value propositions higher up on the page
Further down we can see this row of icons:

The icons themselves are clear and communicate very simply Petstock’s compelling value propositions or “reasons to buy from us” – this is so crucial to the buying decision and we think they have done an awesome job with the design.
But they are located midway down the page, meaning users have to scroll a while to see them. By moving the icons higher up the page, users will more likely see (and hopefully be swayed by) the value offerings. Always place compelling value propositions further up the page.
3. Show Categories with sale/promo tags above the fold to get people to scroll down
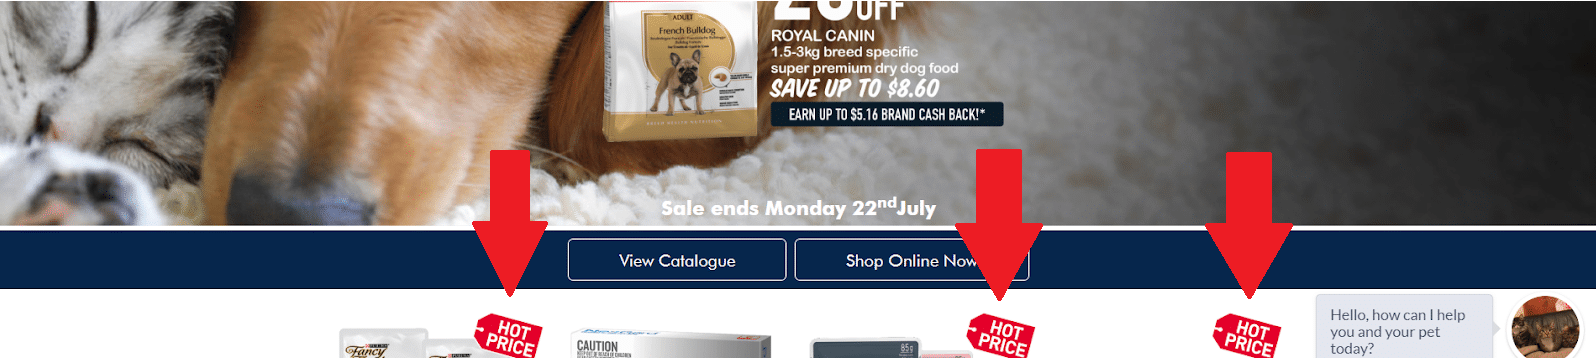
There are some products with “Hot Price” red tags just above the fold. This is great, as sale products attract attention and let the user know there could be some great deals below the fold, motivating people to scroll down.
4. Use a visually clear and compelling Newsletter Signup to grow your email list [your biggest asset]
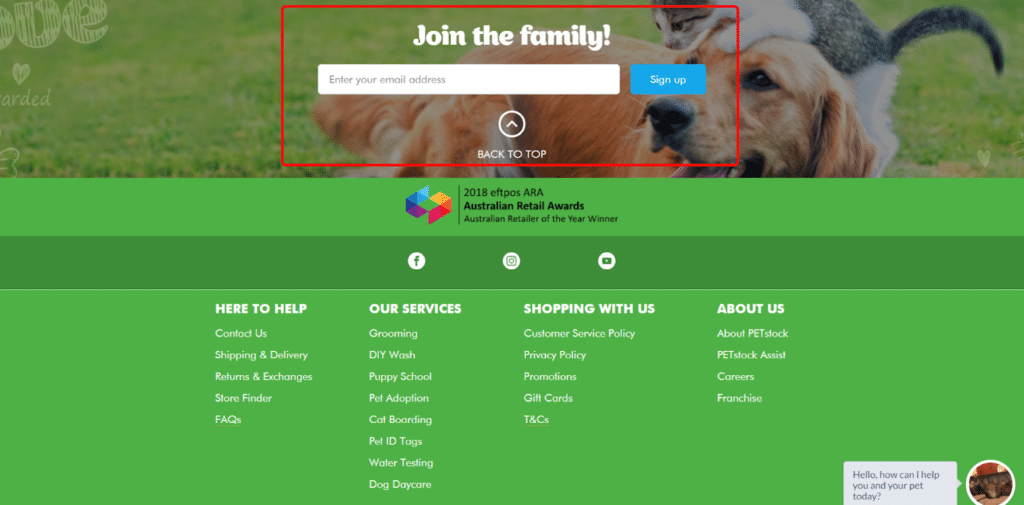
This is a well known best practice, but I had to mention it. A good, visually clear text field asks users to enter their email address. However, the signup heading is a bit ambiguous: “Join the Family!”
When you want users to signup to your newsletter, you’re asking for personal information, so you need to sell it. Try to use an incentive like “Get $20 off your first order! Join the family!” or “Get exclusive online-only deals.”
Category Page
1. Use less distracting and smaller photos to communicate value propositions
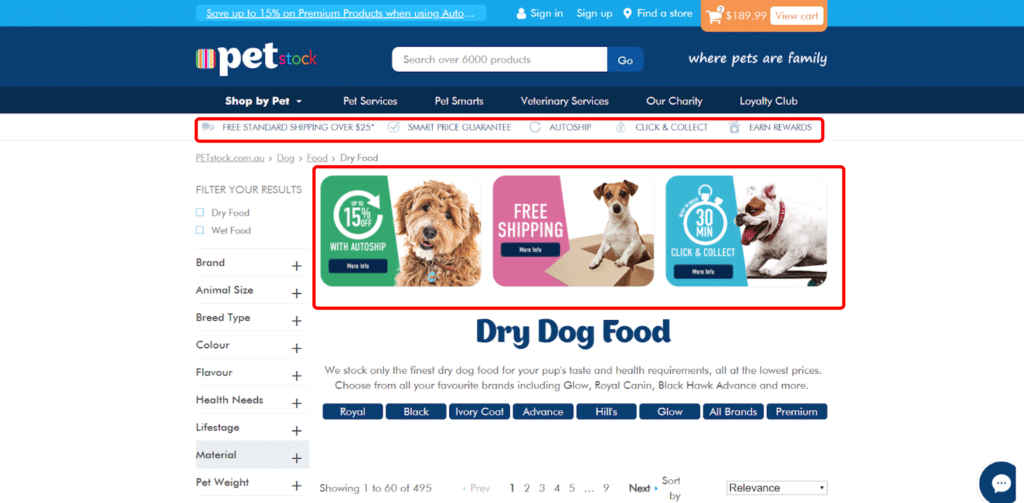
On their category pages, I noticed they have a thin banner below the main navigation bar providing information about Free Shipping, Auto Ship discounts and Click and Collect options – this works well as it’s a great reminder for customers and doesn’t take up much space.
However, there are also three additional, larger CTAs for the same information with associated pet images.
To reduce cognitive load, always avoid repeating information. Additionally, these images push the product content below the fold, when the products should really be the stars of the product category page.
Although the puppers are cute, these images do distract from the product’s content. When adding new elements to a page, it’s important to keep in mind “What’s the objective of this page?”. The Category page’s objective is to help customers find the product that meets their needs. Nothing else should override that objective.
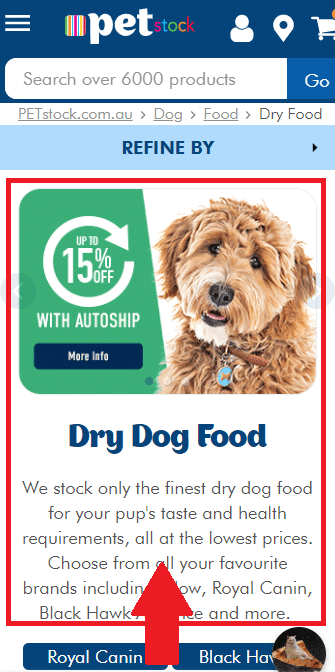
For their mobile version of the page, Petstock might want to look at bringing the products upwards above the fold. They can do this by reducing the size of the value proposition banners or shortening the category description.
2. Use promo stickers to get attention
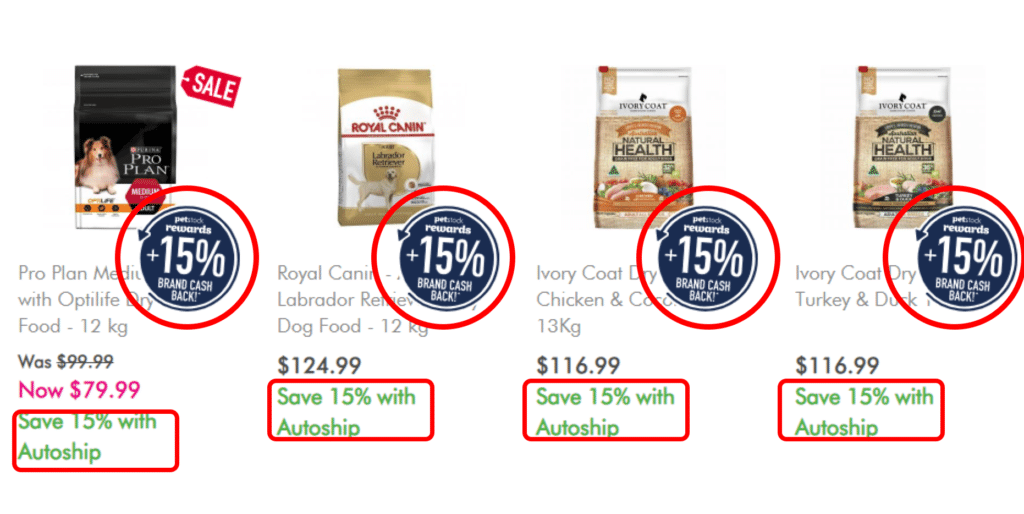
In this section, the red SALE sticker on some products gets your attention effectively and keeps you scrolling down. With the exception of luxury goods, using promo stickers on Category pages is a must. Customers don’t want to be forced to find the SALE page to figure out what’s on sale. Good job!
The 15% Brand Cashback sticker is enticing, however, it covers the product title – a clerical error I’m sure, but not a great user experience. “Brand cashback” isn’t self explanatory, and seems vague. You don’t want users to navigate away from their buying journey to find out!
The customer doesn’t need to be reminded again that they can save 15% with Autoship since I’ve been told twice before above.
Taking out the unnecessary content would simplify the page and show the user more products per screen.
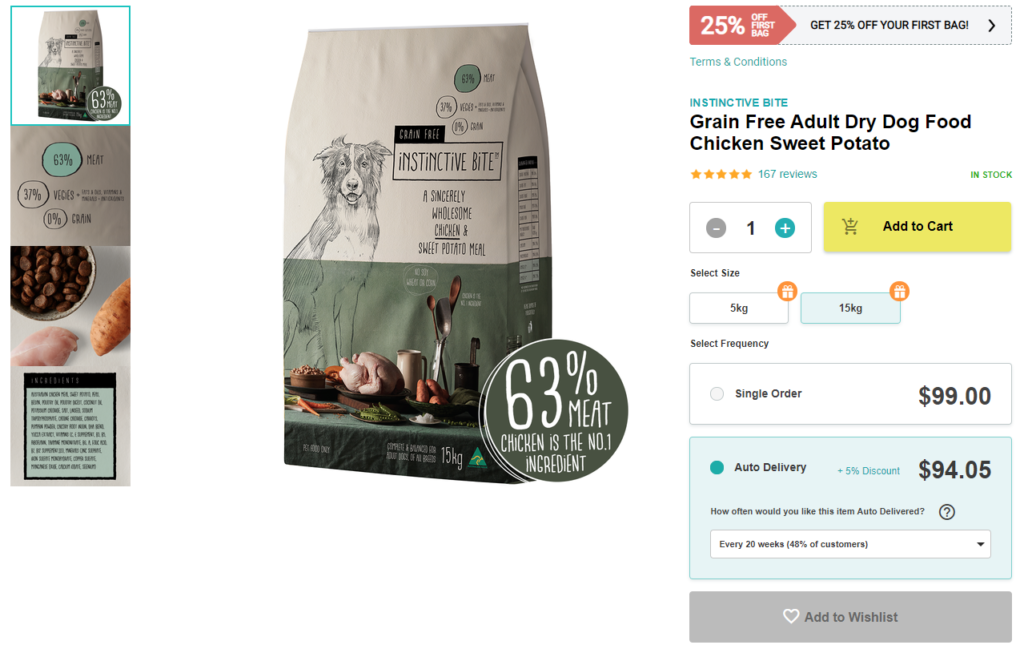
Product Page
1. Price should be super clear. Subscription prices should be smaller in size to avoid confusion.
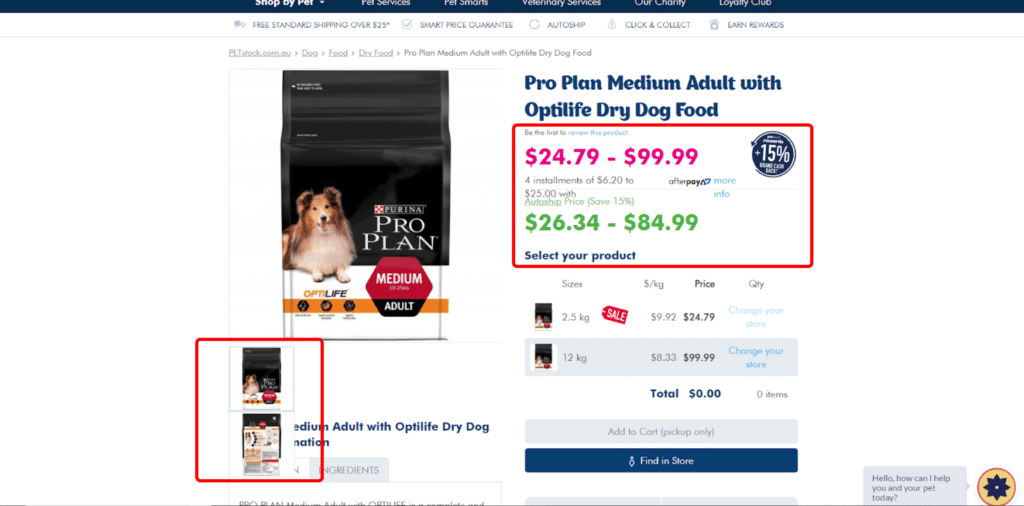
There’s a bit of a cognitive overload here.
First off, the different prices, price range and discounted auto-ship pricing is all very overwhelming and confusing for a customer. Simplifying the text, sticking to a simpler pricing and colouring system would create less friction for the customer. For example, instead of giving a ‘price range’, you could say ‘From $24.79’.
I understand there is a push for Auto-ship because subscriptions means recurring revenue, so a less confusing way could be to reduce the size of the Auto-ship pricing in green, so you’re not at risk of compromising the one-off sale. Ideally, this should be AB tested.
It’s great that there is a star rating system for most (not all) products and reviews further down the page. Good social proof.
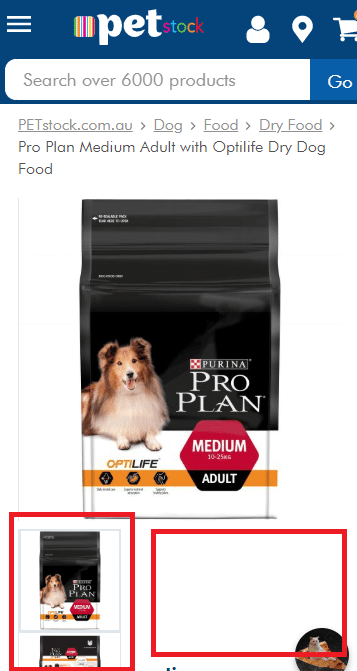
This is the mobile version of a product page. You can see right off the bat that the product images are laid out in a strange way so there is an inefficient use of space above the first fold. It is also lacking crucial information above the fold: No prices, no product title, no add to cart button. Remember, always prioritise content that drives buying decisions further up the page so users don’t need to scroll far down to find it.
Here are a few examples from other online pet stores that do this page well:
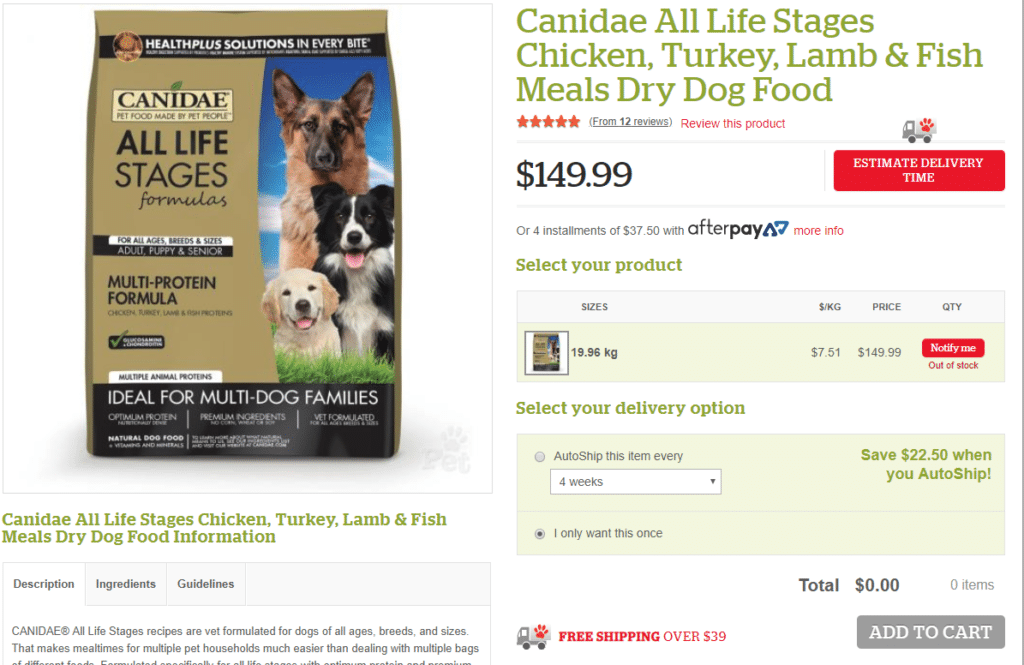
Notice these sites have very clean and tidy UI, with only the most crucial elements pushing for your attention. Product pages should not have too much unnecessary cognitive load so the shopper can focus on what matters most for their buying decision.
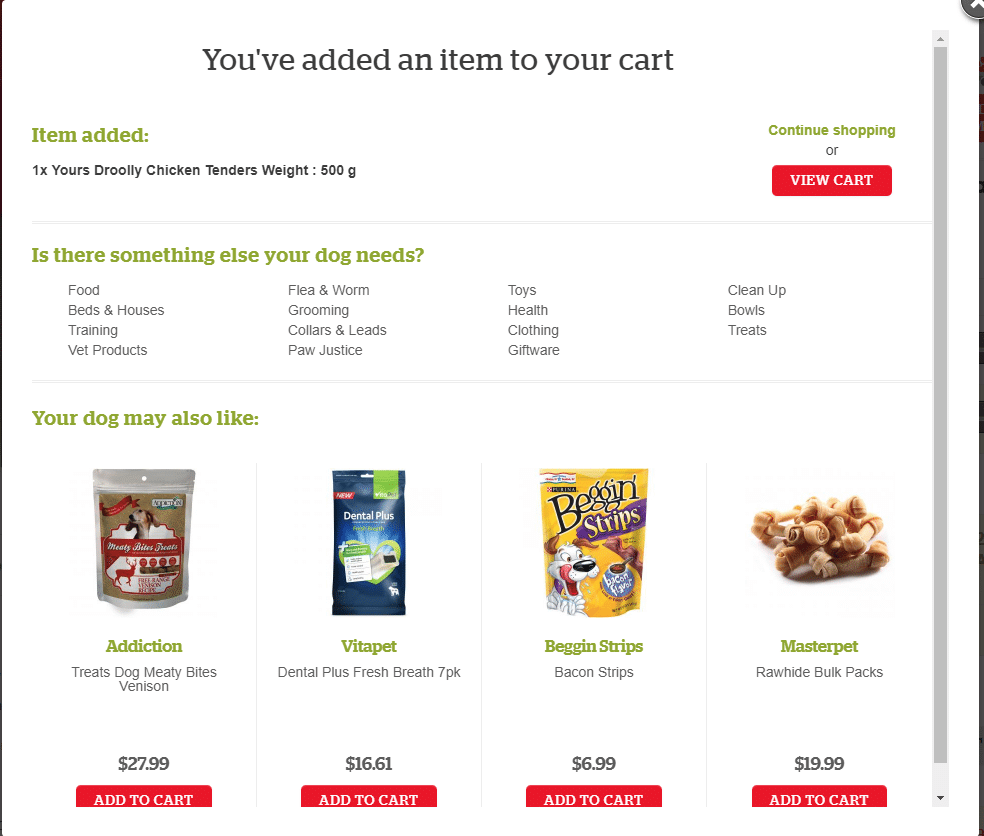
2. Prompt users to go to Cart. And Upsell.
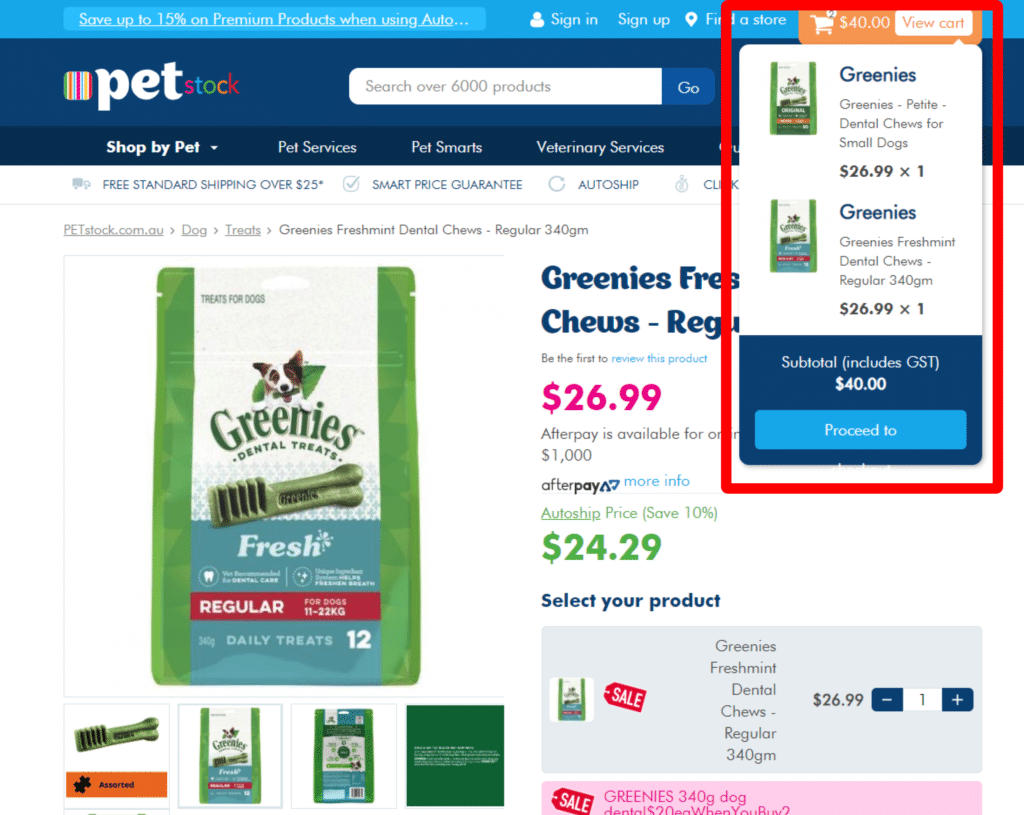
After adding a product to the cart there is no cart popup, just a tiny animation on the cart icon on the header (a pop up does not appear unless “View Cart” is hovered over). The animation is not a clear confirmation that the item has been added to the cart and could be missed.
A good A/B test that could improve Cart visits would be to test a popup appearing whenever a product is added to Cart, with 2 CTAs – CONTINUE SHOPPING and VIEW CART. Customers need to be prompted to go to the next step.
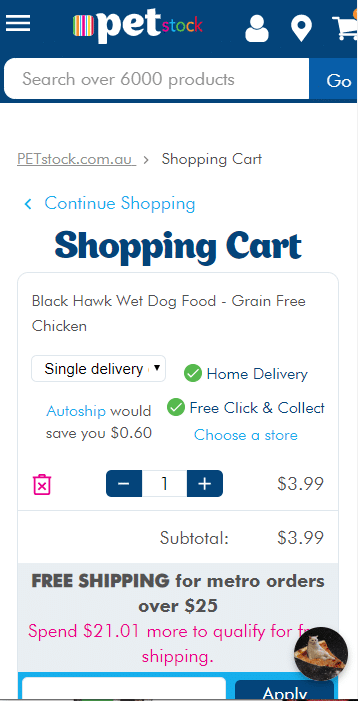
We get a different result when adding to cart on their mobile site. We are taken straight to the cart. (You can find more information in one of our next articles about whether it is best to remain on the product page or take them to a cart page after they click Add to cart.)
One thing clearly missing from this cart page is a product thumbnail image. It is a must.
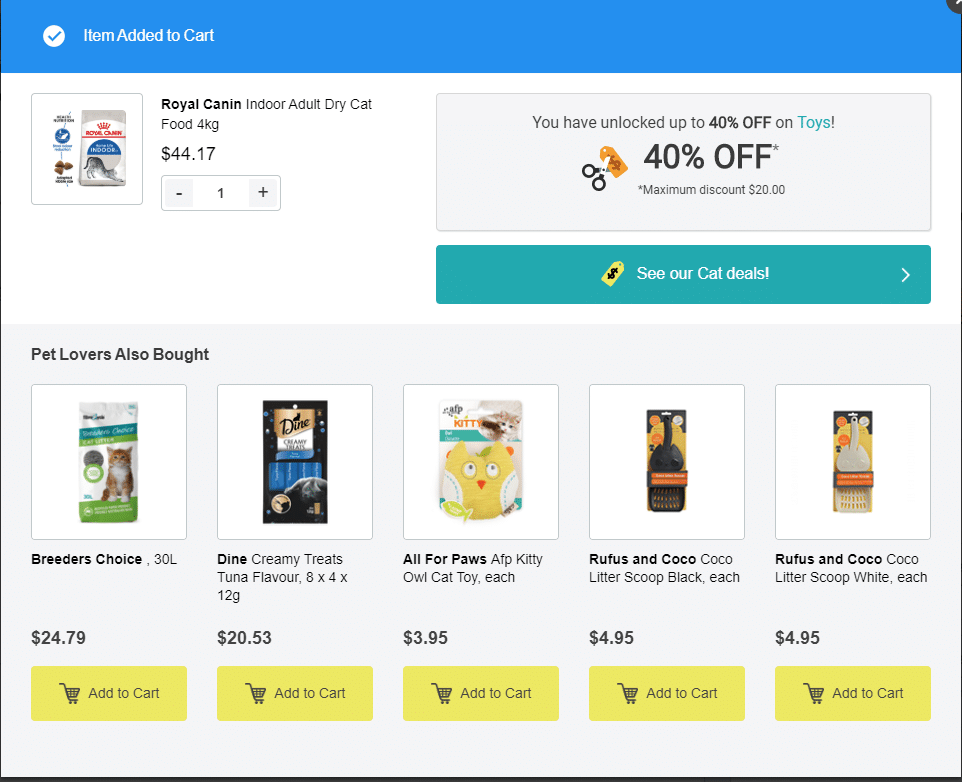
Upsell opportunity: PETstock could consider showing an added to cart popup. A cart popup can also be an opportunity to upsell related products. If the customer is buying dental chews, they might be interested in a Fresh Mint Rope.
Add To Cart Popup Example A
Add To Cart Popup Example B
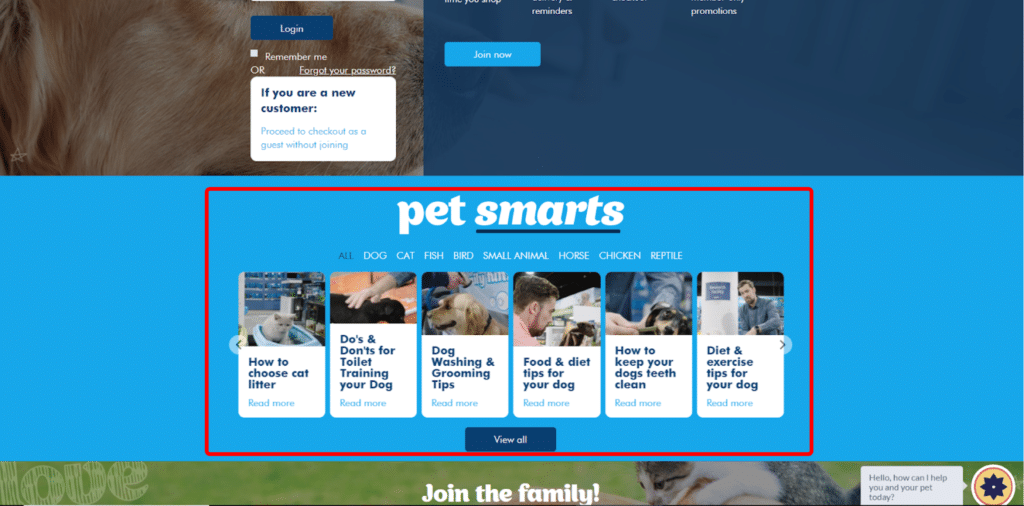
Checkout
1. Remove distracting links from the Checkout
This is the checkout account login/registration page. Down the page, there is a “Pet Smarts” section. This section has links to their blog posts. Links on checkout pages can potentially distract the checkout process and can lead users off the page. Petstock could consider A/B testing having this section versus not having this section on this page.
Petstock has split its checkout process into multiple pages. This creates a couple of issues, one being the long load time mentioned previously. Additionally, every extra page is a potential drop off point.
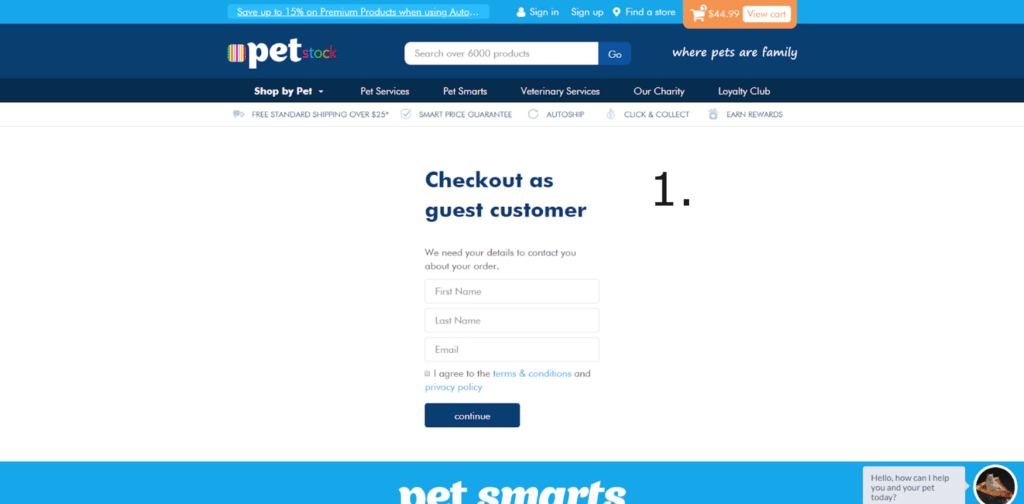
Checkout Sign-in
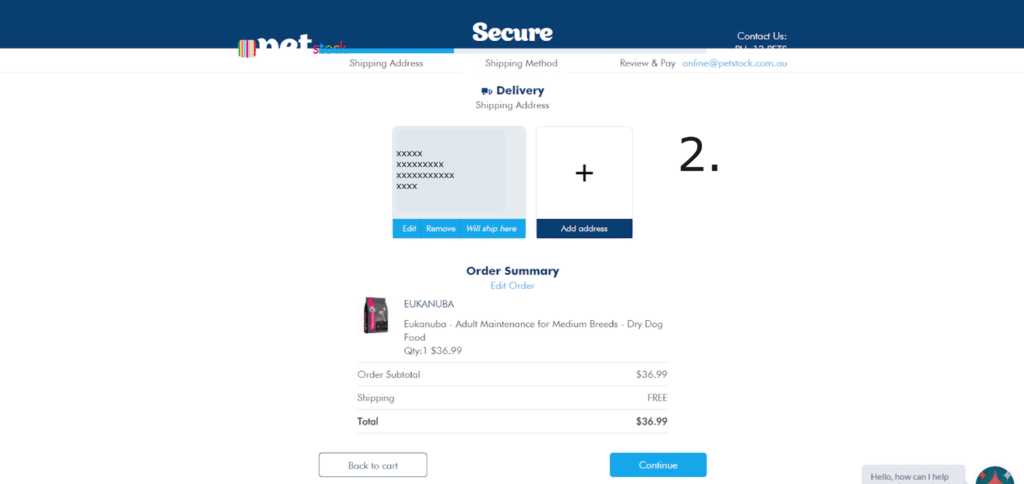
Shipping Address
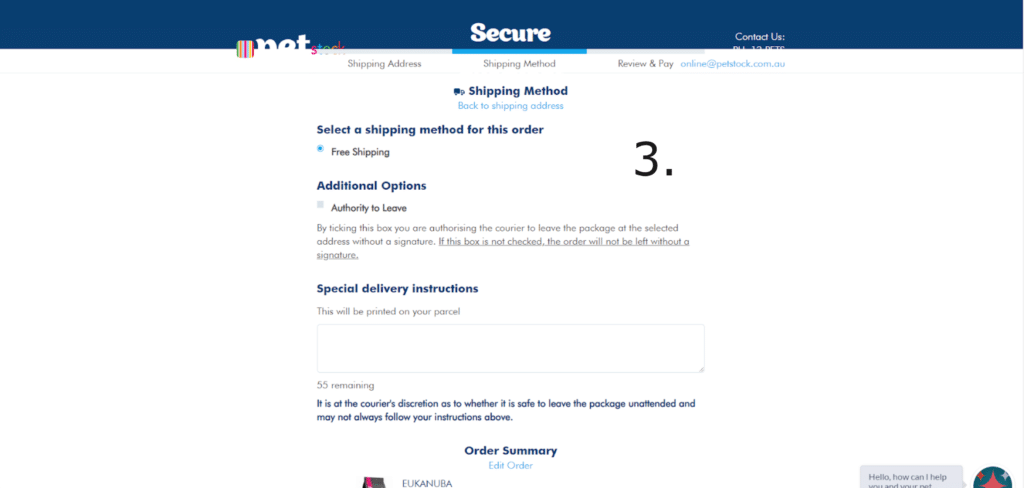
Shipping Method
Above are the three steps/pages required before we finally reach the payment page.
This works for some website audiences where they prefer more consumable steps. But it can also be detrimental.
It’s crucial to review what percentage of customers are dropping-off cross each step in Google Analytics or Heap Analytics. If high, you know you have too many steps.
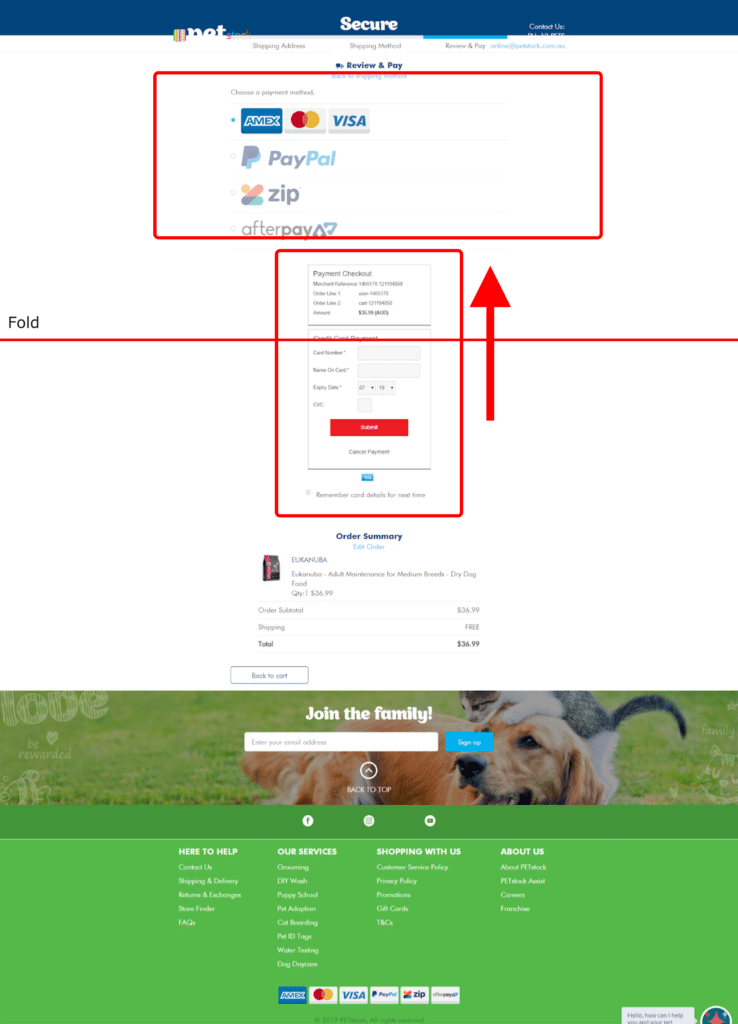
Payment Page
The user interface of this payment page isn’t optimised for a user-friendly experience.
The payment information fields should be prioritised further up above the fold. The payment methods can also be reduced to a smaller size.
Checkout Page tip: By removing the footer, we can reduce any distraction that may lead customers away from completing payment.
To sum up…
Petstock has a fairly impressive website and there are some effective strategies other pet stores can learn from. However, there are some areas of opportunity Petstock can optimise or test to increase their conversion rate and profits. Simplifying their product and checkout pages should result in some quick wins and give them an edge in the competitive online pet store market. Meow.
Whose website should we review next? Let us know in the comments for our next CRO Review!
The above points are best practices. But just using best practices won’t solve all your drop off issues.
For sustainable long-term improvements, your data and real customer evidence can identify the changes and tests your site really needs. You need to be mining your data, observing customer behaviours, seeing which pages are hot (and which ones aren’t), and asking your shoppers what kind of site would keep them coming back.

Scandic Hotels Review : Scandic Popular Hotels & Destination

Scandic Hotels – A Pioneer in Scandinavian Hospitality Excellence

REI Summer Deals: Sale, Clearance, REI Outlet and more

Food Lion Review

REI Summer Sale: Upto 50% OFF

REI 4th of July Sale: Save Up to 50% on Outdoor Gear and Apparel

Nanny Care Review

Exploring Grandi Navi Veloci: The Gateway to Mediterranean Adventures

Best Traeger Grill Review: Are Traeger Still King in 2023?

REI Anniversary Sale: Upto 30% Off Special Offers
REI Summer Sale: Upto 50% OFF

Constant Contact Info

Constant Contact Review (Effective Email Marketing Software)

Review On The Themeforest 2020

Hubspot Review- Inbound Marketing, Sales, and Service Software

Wix Review 2022
REI 4th of July Sale: Save Up to 50% on Outdoor Gear and Apparel

Bluehost Review 2020

Why Allbirds Wool Runners Are The Most Comfortable Shoes

Take Advantage Of Appsumo – Read These Best Tips
-
 e commerce10 months ago
REI Summer Sale: Upto 50% OFF
-
 Technology2 years ago
Constant Contact Info
-
 Marketing2 years ago
Constant Contact Review (Effective Email Marketing Software)
-
 Technology4 years ago
Review On The Themeforest 2020
-
 Technology2 years ago
Hubspot Review- Inbound Marketing, Sales, and Service Software
-
 Technology4 years ago
Wix Review 2022
-
 e commerce10 months ago
REI 4th of July Sale: Save Up to 50% on Outdoor Gear and Apparel
-
 Technology4 years ago
Bluehost Review 2020